
Add-ons
Add-ons extend your server with features like world editing, new items, and chat customization. auto-mcs manages both plugins and mods through the same interface, depending on your server distribution:
- Plugins run on Bukkit-based servers such as CraftBukkit, Spigot, Paper, and Purpur, and generally don’t require players to install anything
- Mods run on Forge, NeoForge, Fabric, and Quilt. Some mods also require players to install matching client-side versions
Installation
Section titled “Installation”Open a server in the Server Manager, then select Add-ons from the taskbar. You can download add-ons from supported repositories or import existing .jar files.
Download add-ons
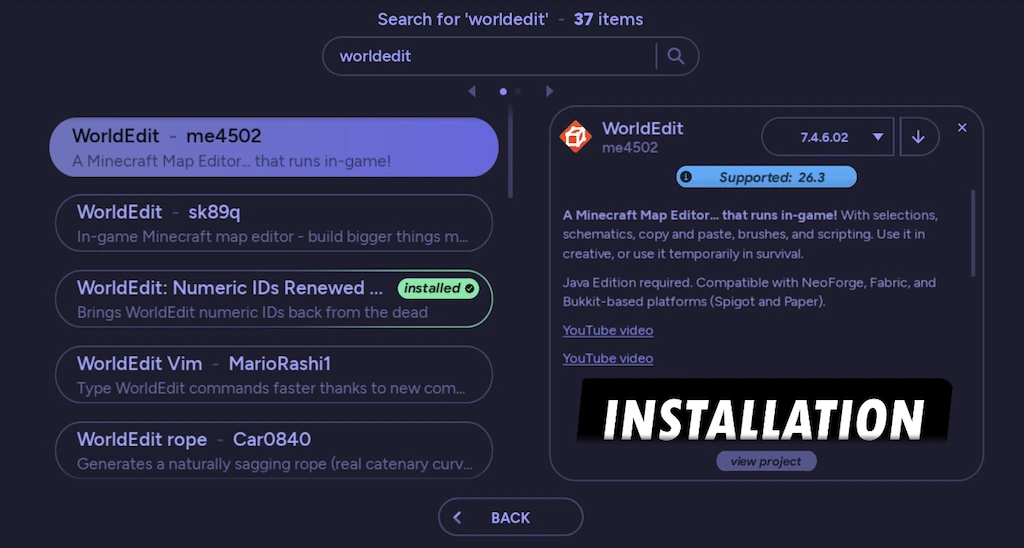
Section titled “Download add-ons”Click Download to open the add-on discovery screen. Enter a search term to browse projects from supported providers such as Modrinth and CurseForge, plus Hangar for Bukkit-based servers.
Select a result to open its details. The panel shows the project’s name, author, description, available releases, a link to the original project, and compatibility information for the selected release. Descriptions can also include images, videos, and other project links.
If the add-on is already installed, the discovery panel marks it as Installed and initially selects the installed release when available. Selecting a different release lets you replace it with that version, including an older version if the provider offers it.
Import add-ons
Section titled “Import add-ons”Click Import to select one or more .jar files, or drag and drop them into auto-mcs. Imported add-ons are copied to the server’s plugins/ or mods/ directory, depending on its distribution.
auto-mcs reads the add-on’s available metadata, but imported files may not always be identifiable on an online provider. Automatic update detection depends on finding a matching downloadable project, so some imported files must be updated manually.
Management
Section titled “Management”The Add-on Manager displays your installed add-ons, with enabled items first and disabled ones below them. Its heading shows enabled and disabled totals separately when disabled add-ons are present, such as 4/1 items for four enabled and one disabled add-on.
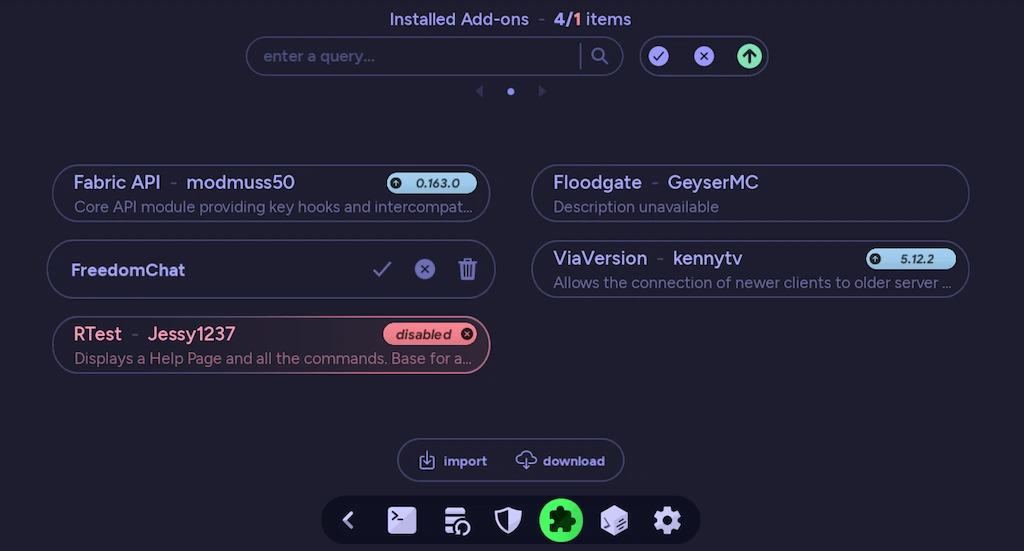
You can use the search bar to filter the list by add-on name, project ID, or author. Click an add-on’s name area to view its version, filename, author, and project ID. An available update will be shown as a version badge, while Incompatible flags an enabled add-on whose loader doesn’t match the server type.

Controls
Section titled “Controls”Global actions
Section titled “Global actions”| Click an add-on | View its installed version, file name, author, project ID, and type |
| Enable / Disable | Toggle one add-on without uninstalling it |
| Enable All | Enable all installed add-ons, including items hidden by a search filter |
| Disable All | Disable all installed add-ons, including items hidden by a search filter |
| Import / Download | Import .jar files or open the discovery screen to find add-ons online |
| Open Directory | Open the server’s add-on folder in your file manager, for locally managed servers |
Add-on actions
Section titled “Add-on actions”| Update | Install an available update for that add-on, or show an up-to-date indicator if no update was found |
| Update All | Install available updates for installed add-ons, or display Up to date when none are available |
| Uninstall | Permanently delete the selected add-on’s .jar after confirmation; the file must be downloaded or imported again to restore it |
Disabled add-ons
Section titled “Disabled add-ons”Disabling an add-on moves its .jar from plugins/ to disabled-plugins/, or from mods/ to disabled-mods/. The file is preserved, and enabling it moves it back to the active folder.
This is useful for testing conflicts without losing the installed file. You can also use Enable All and Disable All to move the entire collection at once. These buttons affect all installed add-ons, not only the currently filtered results.
Updates and compatibility
Section titled “Updates and compatibility”auto-mcs checks installed add-ons for updates when you open the manager. Add-ons with a recognized compatible update show an update action and available version. You can update them individually, or use Update All. Updates to disabled add-ons preserve their disabled state.
When changing a server’s Minecraft version or distribution, auto-mcs also attempts to find appropriate add-on versions. If it cannot update an add-on for the changed server environment, it may leave the existing file disabled instead. If the server fails to start after changing add-ons, see Server Troubleshooting. A back-up is created before major server changes.