
Headless
Headless mode provides a terminal-based interface to auto-mcs without requiring a graphical desktop. It is designed primarily to remotely manage headless Linux and macOS instances through Telepath. This is useful on a VPS, dedicated server, or the Mac Mini in the closet…
Headless mode supports basic operations such as creating and importing servers, editing server.properties, using the server console, saving back-ups, and managing Telepath. For advanced management, you’ll need to pair a desktop client and use the normal graphical interface.
The Telepath API is started on launch and ignores all pair requests by default. You can stop the API for the current session with telepath stop.
Initialization
Section titled “Initialization”| To launch in headless: | |
|---|---|
| Linux | ./auto-mcs --headless |
| macOS | /Applications/auto-mcs.app/Contents/MacOS/auto-mcs --headless |
To automatically launch one or more existing servers when auto-mcs starts, use the --launch (or -l) startup flag with comma-separated server names. This is an application launch argument, not a command entered into the headless prompt:
./auto-mcs --headless --launch "My Server, Server 2"If your server doesn’t have a desktop environment, auto-mcs will launch in headless mode automatically from the active TTY. It’s recommended to use a multiplexer to maintain TTY access if needed.
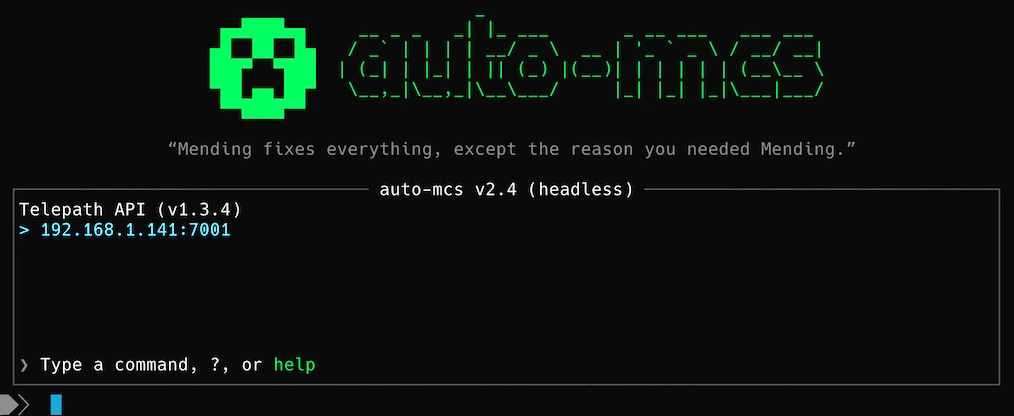
A full command reference can be obtained by pressing ??? or running help in the headless CLI (command-line interface). For reference, this is also provided below.
Interface
Section titled “Interface”The headless interface opens to the main menu displaying the auto-mcs version, Telepath version and host status, a command feedback box, and a command bar at the bottom. Commands are entered inside auto-mcs, not in your operating system’s shell. The command bar displays hints as you type, including sub-commands, existing server names, Java vendors, Minecraft versions, and instant templates.
| Controls: | |
|---|---|
| EnterEnterEnter | Run the typed command |
| ??? | Show contextual help for the current command or sub-command, without submitting it |
| Tab⇥Tab or →→→ | Accept a suggested completion when the cursor is at the end of the input |
| ↑↑↑ / ↓↓↓ | Navigate command history (up to 100 recent entries) |
help | Show all commands |
help <command> | Show syntax for a particular command family |
exit | Exit auto-mcs; attempts to gracefully stop running servers during shutdown |
Server console
Section titled “Server console”Starting a server will automatically attach to its console; this includes console output, a command input, server information, and performance indicators similar to the GUI.
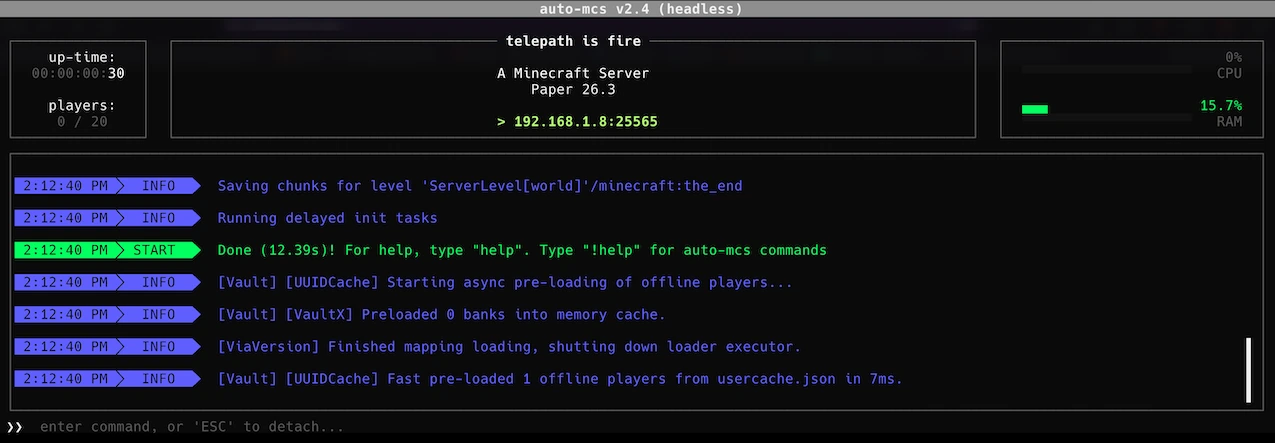
You can issue Minecraft commands directly, including auto-mcs console commands. The console supports command history with ↑↑↑ / ↓↓↓. See the Console guide for more details on the console. For startup failures or crashes, see Server Troubleshooting for reading Minecraft logs and crash reports.
Press EscEscEsc to detach from the console and return to the main menu. Detaching does not stop the Minecraft server. You can reconnect to the console of a running server at any time by running console My Server from the command bar.
Properties editor
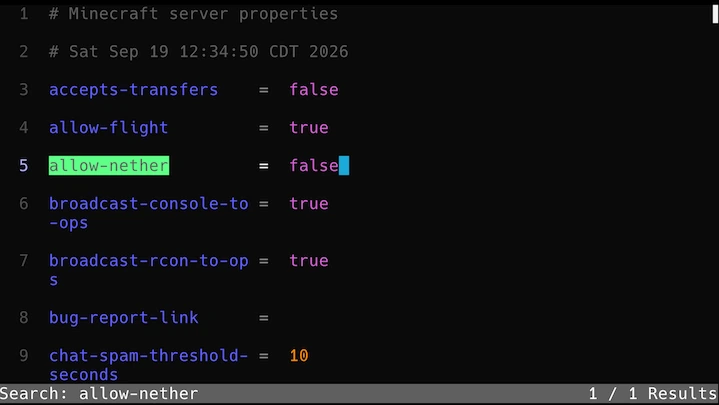
Section titled “Properties editor”Use server properties My Server to open the terminal editor for the selected server’s server.properties file. It supports scrolling between editable settings, editing values, and a search.
| ↑↑↑ / ↓↓↓ | Move between editable settings |
| PageUpPageUpPageUp / PageDownPageDownPageDown | Move through the property list |
| Ctrl+F⌃+FCtrl+F | Search properties |
| SpaceSpaceSpace | Toggle true and false values |
| EscEscEsc | Save changes and return to the main menu |
| Ctrl+C⌃+CCtrl+C / Ctrl+Q⌃+QCtrl+Q | Exit without saving changes |
Application log
Section titled “Application log”debug log opens the application log viewer. This is the same terminal output that would be displayed in the TTY in a GUI session. It is separate from the Minecraft server console, and EscEscEsc returns to the main menu.
Working with servers
Section titled “Working with servers”From the command bar you can create, import, delete, and manage the lifecycle and some settings of your servers. For example:
server create paper:latest My Serverserver listserver info My Serverserver launch My Serverserver stop My ServerFor full setup considerations see Create a Server, and for importing external installations or .amb back-ups see Import a Server.
For remote file management and advanced operations, connect a Telepath client to do everything supported in the auto-mcs GUI remotely.
Command reference
Section titled “Command reference”These are all the supported commands that can be entered into the command bar. Names and paths shown in <angle brackets> are placeholders, and shouldn’t be interpreted literally.
General commands
Section titled “General commands”help | Display available commands |
help <command> | Display usage and sub-commands for a command family |
version | Display auto-mcs build/version information |
exit | Exit auto-mcs |
Server management
Section titled “Server management”server list | List installed servers; asterisks mark running servers |
server info <server name> | Display basic information about a server |
server create <type:version> <server name>server create instant:<filename> <server name> | Create a new Minecraft server by type & version, or by instant template |
server import <path> | Import an existing server directory or auto-mcs back-up |
server launch <server name> | Launch a server |
server stop <server name> | Stop a running server |
server restart <server name> | Restart a running server |
server kill <server name> | Terminate a running server |
server properties <server name> | Open the server.properties editor |
server delete <server name> | Delete a server (automatically saves a back-up) |
console <server name> | Open the selected server’s console |
server info My Serverserver stop My Serverserver restart My ServerBack-ups
Section titled “Back-ups”backup save <server name> | Create a server back-up |
backup restore <server name> | Restore the latest server back-up |
backup save My Serverbackup restore My ServerSee Back-ups for additional GUI-based back-up management and restoration options.
Utilities
Section titled “Utilities”java list | List available Java runtimes/vendors |
java vendor <vendor ID> | Select the default runtime vendor |
autostart enable <server name> | Start a server automatically when auto-mcs launches |
autostart disable <server name> | Disable its automatic launch |
playit enable <server name> | Enable playit.gg tunneling for a server |
playit disable <server name> | Disable playit.gg tunneling for a server |
java vendor graalvmautostart enable My Serverplayit enable My ServerTelepath
Section titled “Telepath”telepath start | Start the Telepath API (started by default) |
telepath stop | Stop the Telepath API |
telepath pair | Listen for and display a pairing request |
telepath users | Display paired clients and their connection status |
telepath restrict <#ID> | Toggle access restriction for a client |
telepath revoke <#ID> | Revoke a client’s pairing |
telepath reset | Clear the host’s saved Telepath pairings |
See the Telepath headless user management and pairing guide for more details.
Maintenance
Section titled “Maintenance”debug status | Report debug logging status |
debug enable | Enable debug logging for the current session |
debug disable | Disable debug logging for the current session |
debug log | Open the application log viewer |
update info | Show details of an available application update, on official releases |
update install | Install an update and restart, on official non-Docker releases |
Running the GUI in a browser
Section titled “Running the GUI in a browser”Although auto-mcs is designed primarily as a native desktop application, it’s possible to run the full graphical interface from a web browser using a custom Linux container. This requires a virtual X11 display such as TurboVNC, a lightweight window manager like Fluxbox, and the necessary graphical dependencies, including X11 and Mesa/OpenGL libraries. A VNC client such as noVNC, paired with websockify, can then expose the desktop session through a web browser.
Unlike the official Docker image, which provides access to the headless CLI through a web terminal, this approach runs the actual desktop application inside the container. Since auto-mcs isn’t built as a web application, some features may require additional configuration or dependencies; particularly file dialogs, desktop integration, and graphical acceleration.